Being that Android Studio is now the official IDE for Android development, and Eclipse is no longer going to be supported, we thought it would be important to provide updates on the code samples for Introduction to Android Application Development: Android Essentials, Fourth Edition, so that you may use the code samples with Android Studio.
Since the code samples were created to work with Android SDK Version 4.3, API Level 18 (Jelly Bean), and Android SDK Version 4.4, API Level 19 (KitKat), the samples have been made to work with these API levels, and where previously available, will also work with lower API levels if the older code samples were also made to support any lower API levels.
In order to get Java and Android Studio configured for your system appropriately, we will list the best resources for walking you through how to do so in the next few paragraphs. Make sure you go through each link presented here to make sure you are configuring your system appropriately. Don’t skip reading the information posted at the links presented here, these are very important steps to getting your system configured.
First off, we would like to point out some helpful resources so that you are able to install Java on your system. Android Studio currently requires using JDK version 7. Here is where you will find the downloads for your system, Oracle Java SE Development Kit 7 Downloads found here: http://www.oracle.com/technetwork/java/javase/downloads/jdk7-downloads-1880260.html
The following resource is for the documentation for JDK 7, Oracle Java SE Development Kit 7 Documentation found here: http://www.oracle.com/technetwork/java/javase/documentation/java-se-7-doc-download-435117.html. This may help you learn more about Java.
The following resource should help you install the Java JDK 7. Find the appropriate instructions for your system here: http://docs.oracle.com/javase/7/docs/webnotes/install/index.html
Once you have installed Java for your system, you need to install Android Studio. You may need to perform an additional set of steps depending on your system too. The official Android developer documentation should describe those steps, and any trouble shooting you may need to perform at the Android Developer Tools, Official Documentation titled “Installing Android Studio” found here: https://developer.android.com/sdk/installing/index.html?pkg=studio. Here you may be presented with any additional steps necessary so that Android Studio is able to detect the correct Java installation on your system, and is able to run properly.
The only recommendation we have for installing Android Studio, is to make sure you select all components to install during the installation. You will be presented with a dialog for selecting the components to install that looks similar to this screenshot:
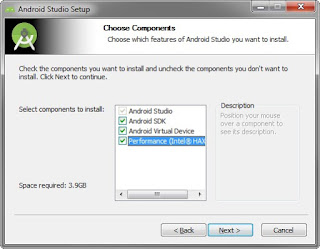
Note that this will only install the latest Android SDK and Android Virtual Device available. There is a component named “Performance (Intel® HAXM)”. If this is not available on your system to install, don’t worry about this. If it is available, you will want to install this as it will boost the performance of the emulator for running the Android Virtual Devices.
If you are installing the latest version of Android Studio that means API Levels 18 and 19 will not be installed by default, as only the latest will be installed. In order for the samples to work, you need to also install APIs level 18 and 19 on your system. Here is a detailed guide on how to install the appropriate SDK packages and support libraries on your system, Android Developer Tools, “Adding SDK Packages” found here: https://developer.android.com/sdk/installing/adding-packages.html
Assuming that you have followed all the detailed installation and configuration instructions presented in the links found in this blog post appropriately, you should now be ready to download and open the sample source code provided with this book for running in Android Studio.
You also need to create appropriate Android Virtual Devices (AVDs) for your system, or use hardware devices with the appropriate API levels that are capable of running the Android samples found with this book. To make sure you are setting up your system appropriately with AVDs and for configuring hardware devices to install the sample applications, see the “Developer Workflow” here https://developer.android.com/tools/workflow/index.html and the “Managing AVDs with AVD Manager” here https://developer.android.com/tools/devices/managing-avds.html. To learn how to use an emulator, see the “Using the Emulator” here https://developer.android.com/tools/devices/emulator.html. To learn how to setup your hardware devices for development, see “Using Hardware Devices” here https://developer.android.com/tools/device.html.
Make sure you have already downloaded the samples which can be accessed from here:
Then, start Android Studio, and choose the option “Open an existing Android Studio Project” and browse to the root folder of the sample project of your choosing and click “OK”. Your installation of Android Studio will then begin loading and building the project. Assuming you performed all the installations steps appropriately, you should not encounter any issues. If you did encounter any issues, Android Studio will most likely present how to fix these issues in the “Messages” window, showing any errors encountered, with tips on how to fix them. The errors usually include clickable tips that are meant to help you work through fixing these issues. If you receive any issues, perform the recommended fixes until there are no issues left with your installation.
You should now have a working configuration and be ready to install the apps on your AVD or hardware device. We listed links above that will help you get these setup and launched so that you can install the sample app you selected, so if you skipped those links above, make sure you read them for a full explanation of how to get them setup and launched appropriately for installing applications. Just for clarification, here are those links again where you can learn how to create and launch an AVD here https://developer.android.com/tools/devices/managing-avds.html, how to use the emulator here https://developer.android.com/tools/devices/emulator.html, how to configure a hardware device for development here https://developer.android.com/tools/device.html, and how to build your projects with Android Studio here https://developer.android.com/tools/building/building-studio.html.
Once you have an emulator running or a hardware device configured, in Android Studio, select “Run” from the menu, and choose “Run ‘app’”. You should then choose the appropriate emulator/device that is capable of supporting API Level 18 and 19 for installing the app on, then click “OK”. You will see the app install on the emulator/device. We hope this blog post is useful for helping you get the code samples working for Android Studio.
You may also like to know about two other valuable resources for those coming from Eclipse ADT:
Android Developer Tools: Official Documentation titled “Migrating to Android Studio” found here: https://developer.android.com/sdk/installing/migrate.html
Android Developer Tools: Official Documentation titled “Transition Guide for Eclipse ADT” found here: https://developer.android.com/tools/studio/eclipse-transition-guide.html
Happy coding!