Our book, "Introduction to Android™ Application Development: Android Essentials, Fifth Edition," written by Joseph Annuzzi, Jr., Lauren Darcey, and Shane Conder, contains many sample applications referenced throughout. We would like to share our code samples with you to help you learn the material of the book which can be accessed below.
These code samples were created with Android Studio for the 5th edition.
Being that Android Studio is now the official IDE for Android development, and Eclipse is no longer going to be supported, we thought it would be important to provide updates on the code samples for Introduction to Android Application Development: Android Essentials, Fourth Edition, so that you may use the code samples with Android Studio.
Since the code samples were created to work with Android SDK Version 4.3, API Level 18 (Jelly Bean), and Android SDK Version 4.4, API Level 19 (KitKat), the samples have been made to work with these API levels, and where previously available, will also work with lower API levels if the older code samples were also made to support any lower API levels.
In order to get Java and Android Studio configured for your system appropriately, we will list the best resources for walking you through how to do so in the next few paragraphs. Make sure you go through each link presented here to make sure you are configuring your system appropriately. Don’t skip reading the information posted at the links presented here, these are very important steps to getting your system configured.
First off, we would like to point out some helpful resources so that you are able to install Java on your system. Android Studio currently requires using JDK version 7. Here is where you will find the downloads for your system, Oracle Java SE Development Kit 7 Downloads found here: http://www.oracle.com/technetwork/java/javase/downloads/jdk7-downloads-1880260.html
Once you have installed Java for your system, you need to install Android Studio. You may need to perform an additional set of steps depending on your system too. The official Android developer documentation should describe those steps, and any trouble shooting you may need to perform at the Android Developer Tools, Official Documentation titled “Installing Android Studio” found here: https://developer.android.com/sdk/installing/index.html?pkg=studio. Here you may be presented with any additional steps necessary so that Android Studio is able to detect the correct Java installation on your system, and is able to run properly.
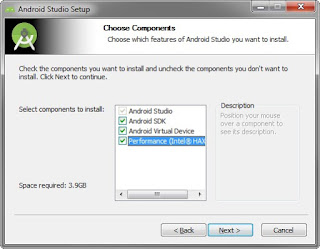
The only recommendation we have for installing Android Studio, is to make sure you select all components to install during the installation. You will be presented with a dialog for selecting the components to install that looks similar to this screenshot:
Note that this will only install the latest Android SDK and Android Virtual Device available. There is a component named “Performance (Intel® HAXM)”. If this is not available on your system to install, don’t worry about this. If it is available, you will want to install this as it will boost the performance of the emulator for running the Android Virtual Devices.
If you are installing the latest version of Android Studio that means API Levels 18 and 19 will not be installed by default, as only the latest will be installed. In order for the samples to work, you need to also install APIs level 18 and 19 on your system. Here is a detailed guide on how to install the appropriate SDK packages and support libraries on your system, Android Developer Tools, “Adding SDK Packages” found here: https://developer.android.com/sdk/installing/adding-packages.html
Assuming that you have followed all the detailed installation and configuration instructions presented in the links found in this blog post appropriately, you should now be ready to download and open the sample source code provided with this book for running in Android Studio.
Make sure you have already downloaded the samples which can be accessed from here:
Then, start Android Studio, and choose the option “Open an existing Android Studio Project” and browse to the root folder of the sample project of your choosing and click “OK”. Your installation of Android Studio will then begin loading and building the project. Assuming you performed all the installations steps appropriately, you should not encounter any issues. If you did encounter any issues, Android Studio will most likely present how to fix these issues in the “Messages” window, showing any errors encountered, with tips on how to fix them. The errors usually include clickable tips that are meant to help you work through fixing these issues. If you receive any issues, perform the recommended fixes until there are no issues left with your installation.
Once you have an emulator running or a hardware device configured, in Android Studio, select “Run” from the menu, and choose “Run ‘app’”. You should then choose the appropriate emulator/device that is capable of supporting API Level 18 and 19 for installing the app on, then click “OK”. You will see the app install on the emulator/device. We hope this blog post is useful for helping you get the code samples working for Android Studio.
You may also like to know about two other valuable resources for those coming from Eclipse ADT:
Ever since the preview release of Android M was released, there was speculation that Android M would be named Marshmallow. Well in the past couple of days, Google officially revealed that Android M will in fact be code named Marshmallow. The preview release had a code name of MNC. You would see the MNC code name within Android Studio, and many have said that MNC stood for Macadamia Nut Cookie according to this blog post, and rumored to have been the internal code name used by Google employees. If you want to learn more about the official release of Android 6.0 Marshmallow, you should read the official Android blog here, and if you have not already done so, you should start preparing your apps so that they are ready to run on Marshmallow as it will be available on Nexus devices shortly.
Considering my fascination with Android as an operating system, I have always been interested in learning about the underlying hardware that powers an Android device. A few things I have always wondered:
What are the components that power a given device?
Who makes these components?
Who would I source the components from?
How is the circuit board designed?
How would I prototype my own device design?
How would I manufacture my own device?
Well, if you follow the Android ecosystem and fancy shiny new devices like me, or if you have ever heard of the "Maker Movement", you are probably aware that there are many new hardware projects in the making that are leveraging the Android OS. Some of these hardware projects are following in the footsteps of the Android Open Source Project (AOSP) by open sourcing their designs. In my opinion, Android sure does make a great fit to pair with an open source hardware design.
I bring these things to you attention because recently I have been working on an exciting Android project of my own -- building a custom Android hardware device -- by leveraging existing open source hardware designs.
What would seem like an obvious choice for a processor today was not entirely apparent early on, but I have settled on an ARM Cortex A9 as the brain of this device. With the OS and processor selected for the device, I am currently tasked with choosing the components that will provide additional functionality, in addition to bringing all of those components together by designing the "central nervous system" of the device.
For those of you not in the know, the “central nervous system” means creating the circuit schematic design and component layout for the printed circuit board. After reviewing many PCB design tools, I decided on a tool by Altium. Turns out that many of the open source hardware designs powering Android (and Linux too) are using an ARM Cortex A9 processor. Better yet, many of these open source hardware projects that are using an ARM Cortex A9 and running Android were designed by engineers using Altium Designer. Considering this, Altium just seemed like the logical choice. It wasn't until I started using Altium Designer and learning the ins and outs of the program, and combining existing open source designs with my desired components, that building a hardware device running Android is actually quite an empowering process when you have the right tool for the job.
This leads me to the reason why I am writing this blog post. Having the right tool for the job is essential. For designing printed circuit boards, I have found that Altium is the right tool for that job, so if you also are designing a circuit board, I suggest taking a look at Altium. For designing Android applications, since Google has released Android Studio as the official IDE for Android development, I recommend that anyone who is still using Eclipse with the ADT Bundle migrate over to using Android Studio as soon as possible. And as a bonus, I wanted all my readers to have access to the book code samples for use with Android Studio, in addition to the code samples that you already have for use with the Android IDE (Eclipse with the ADT Bundle). That way you can use the right tool for your job.
You can access the updated code samples for use with Android Studio here.
In addition to the books code samples, we wanted to share the bonus KitKat chapter to make it easier for readers to find. You will receive access to the chapter below!
When you receive access to the code samples, you will find additional code samples that have been released that work with Android Studio.
Our book is now available as a Rough Cuts manuscript! For those who would like to get started reading the Rough Cuts™ version of "Introduction to Android™ Application Development: Android Essentials, Fourth Edition," head on over to http://safaribooksonline.com to start reading the first few chapters today!
Rough Cuts means that the book is still a work in progress, so if you encounter any content errors, please be aware that this is a still a rough draft. We definitely value your feedback, so if you do encounter any content errors, please email us at introtoandroid4e (at) gmail.com so we can fix these issues before the final printing of the book.
Our book, "Introduction to Android™ Application Development: Android Essentials, Fourth Edition," written by Joseph Annuzzi, Jr., Lauren Darcey, and Shane Conder, contains many sample applications referenced throughout. We would like to share our code samples with you to help you learn the material of the book which can be accessed below.
When you receive access to the code samples, you will find additional code samples that have been released that work with Android Studio.